![How to get past console.log() and start automated testing [simple guide]](https://cdn-images-1.medium.com/max/800/1*Qivhk6WaLFZvyRrF9Z6wMg.jpeg)


image credit: myself
Just like you, console.log was the first thing I learned after taking a JavaScript lesson. Unfortunately, I kept console logging for the rest of my developing journey as a means to test my applications. But there are other great and neat ways and we all know about automated testing suits such as JEST, Mocha and Chai, however it all looks too complicated and hassle to even bother with writing tests. But in the back of my, it always told me, “You are not a real developer if you are not using automated testing.”
I realized the practical reason for testing when I found myself doing manual testing over and over to see if my application is still working or not. Having tests will give me confidence about the things I build, so I started to implement testing into my software development workflow. I still have a great deal to learn about how to thoroughly test my React and Node applications, but for now, I will be sharing some baby steps you can take to start implementing automated testing and maybe reduce using console.log:
Baby Steps towards Automated Testing
I have picked JEST as my JavaScript testing utility. I know there are other testing suites, but JEST is simple and made by Facebook, (the people who made React.js). I’m not religious about tools or languages, so I can learn JEST and take the same principles to other tools.
I installed JEST globally on my computer so I can use it whenever I need, without putting it as a dependency:
npm install jest -g
Modularize Your Functions
Most programs are made out of many smaller functions, so it’s better to have separate functions do tiny things compared to one large function doing everything. This helps to keep things simple and have clear expectations.
To make it easy to test your programs you should modularize your functions. It’s better to put these functions in separate files so once you made and perfected and tested the function, you can leave it as is.
Here’s how I export a function in React’s ES6 exports:
export default myFunction;
And here’s how I export in Node.js (common js):
module.exports = myFunction;
In some applications, I create a helpers.js file to have all the smaller utility functions. Then I just import them to the places I need. This also helps to import from the test suit which I will be discussing ahead.
Make the Functions Return a Value, So we can stop console.logging
As a beginner how do we know the function works as intended? We use console.log like this:
function sum(a, b) {
var result = a + b;
console.log(result);
}
or this:
function sum(a, b) {
return a + b;
}
console.log(sum(2, 2));
console.log(sum(1, 5));
But this has many recurring problems as you try to build many more functions. First, I will need to remember to clean out all the console.log’s I have put out there for testing. Second, the developer console will be spammed by all those console logs which I had mistakenly left out. And finally, it’s a very unreliable way to test the behavior of a function with just console.logs.
Instead, you have the function return value:
function sum(a, b) {
return a + b;
}
// Exporting the function
module.exports = sum;
But then how will I know if the function works as intended?
Enter JEST testing:
You have already made your function which returns a value, then exported the function. Now it’s time to run automated tests. Let me create a file called sum.test.js
Here I will import the sum function (because I want to test it) and add the JEST related methods:
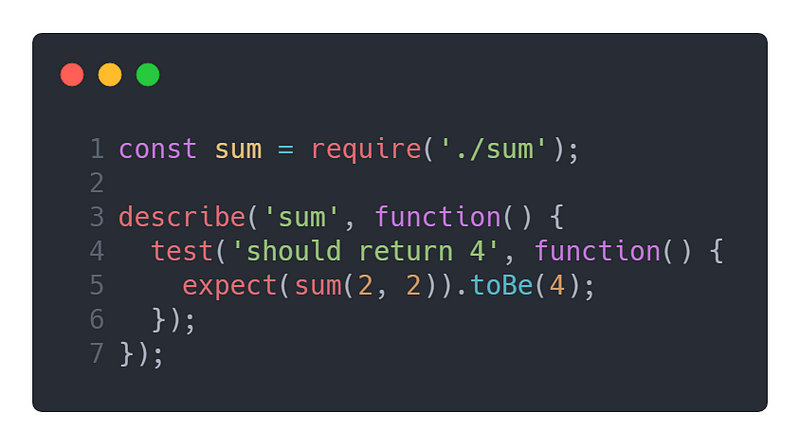
describe and test are global methods that come from the JEST testing utility. describe takes a function as the second argument and then takes the test method which again takes another function as the second argument. Finally, the expect global method can run your function and check it against the desired output you are expecting.
To keep it simple, I am describing the sum function for this test. One test file should test only one function or unit. Then each description can have multiple tests which I will outline later in this article.
Side note on running the tests:
If you are using Create React App, then the testing utility is pre-configured and all you have to do is to just run npm test on the console. But if you are just like me and want to test out simple js files you can try this method:
Generate a package.json file by typing npm init --yes even if you don’t have any dependencies. Now open the package.json file and add this in place of the test section:
"scripts": {
"test": "jest --watchAll"
},
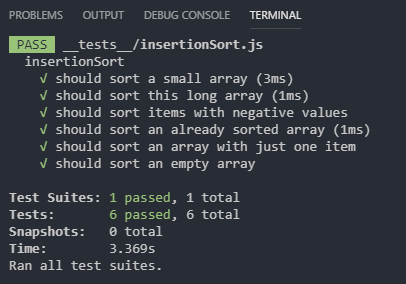
The jest --watchAll allows you to run the test suite. Just type npm test in the console and it should show up your tests:

It’s also important to FAIL the test as well, so you can fix it and make sure everything is working correctly.
I won’t bore you with details, you can check it out yourself but know that you don’t need to know much to run tests. You can use just one or two matchers to make it fit all your needs.
For example, I created an insertion sort function when I was learning algorithms. Instead of doing console.log over and over again to see if my algorithms works, I created a test file and added a few tests to make sure my algorithm is working as expected.

As you can see, one describe method can have multiple tests to check for different cases. I have also used just the .toEqual() matcher to match for all the cases. This shows that, even if there are dozens of matchers you can use, you will just need to use one or two of them to do the day to day testing stuff. As I gain more experience I will start using other methods and advanced implementations.
If you are interested to see the full code of my algorithm and testing suite you can see it here on my github.
Gaining Confidence with Your Code
Now that my function works and I have more than one test case to prove it’s working correctly, I can hand this code over to other developers in my team with confidence. Since the functions are separate from one another, I can stop worrying about the tested ones and focus on the other parts of my application.
This really helps boost your productivity and speed of development. No longer you will have to rely on the pesky console.logs to test if your functions are working correctly.
So go ahead and check out JEST